Please read carefully and thoroughly this manual before starting to use this machine,and keep this manual in safe place for future reference.
400 Rotary pillow packaging machine

Please read carefully and thoroughly this manual before starting to use this machine,and keep this manual in safe place for future reference.
Foreword
Welcome to use automatic rotary type rotary pillow packing machine!
If it is the first time to use our pillow packing machine, please read carefully and thoroughly this “operation manual”, it will help you to use and maintain the machine correctly, assure the safety of people and machine, full play the performance of the machine, reduce troubles and prolong the service life of the machine.
1. Safety Precautions
1) Never start the machine before make familiar with the correct operation methods and safety regulations.
2) Untrained and unauthorized persons are not allowed to operate this machine.
3) Carefully read this manual and understand all of the contend and requirement in this manual before using the machine.
4) The machine can be operated only after it is completely installed and properly adjusted.
5) Before starting the machine, make sure there is no tool or any other object on top of the machine.
6) Before switch off the power , never touch the inside of the machine or the electric equipment.
7) Never leave the running machine unattended-operators should not leave the working scope of the machine during the machine is running.
8) When the machine is running, never touch the sealing wheel, sealing die and moving parts.
9) Electric control circuit must be checked and repaired by prefessional electicians.
10) Do not refit the machine, or install any device, tool or peripheral equipment to the machine without the permission of our company in order to avoid any
danger.
11) If there is anything in the manual you cannot understang, or if you eauipmenter any probiem that cannt be solved with this manual, please contact our company or our sealer, never try to handle it yourself.
12) Do not use this machine in the environment other than the stipulated.
Warning: For your safety and the safety of the machine, do observe all above safety precautions, otherwise, this company will be free from any reponsibility for any accident out of inobservance.
2、 Machine Description
2.1. Machine Application
This machine is designed for packing fixed shaped materials into pillow packages, suitable for packing all kinds of regular shaped solid products, including foodstuff, such as biscuits, breads, moon cakes, candies etc, commodities, industrial parts etc. For small pieces and separated articles, they should be put in to boxes or tied into blocks before this machine can be used to pack them, and this packing method is also applicable to pack other nonsolid products.
2.2.Structural features
1) Dual frequency converter control, bag length is adjustable, no need to adjust idle running distance, adjustment can be make in one step, save time and film.
2) Text type human-machine interface, parameter setting is convenient and quick.
3) Problem self diagnose function, any trouble is clear at a glance.
4) Highly sensible photoelectric eye for color mark tracking, which makes sealing and cutting position more accurate.
5) Independent temperature PID control, more suitable for packing films of all kinds of materials.
6) Positions fix stop function, free from cutter sticking and film waste.
7) Simple driving system, work is more reliable, and maintenance is more convenient.
8) All controls are carried out with software, it is convenient for function adjustment and upgrade, and it will never drop behind.
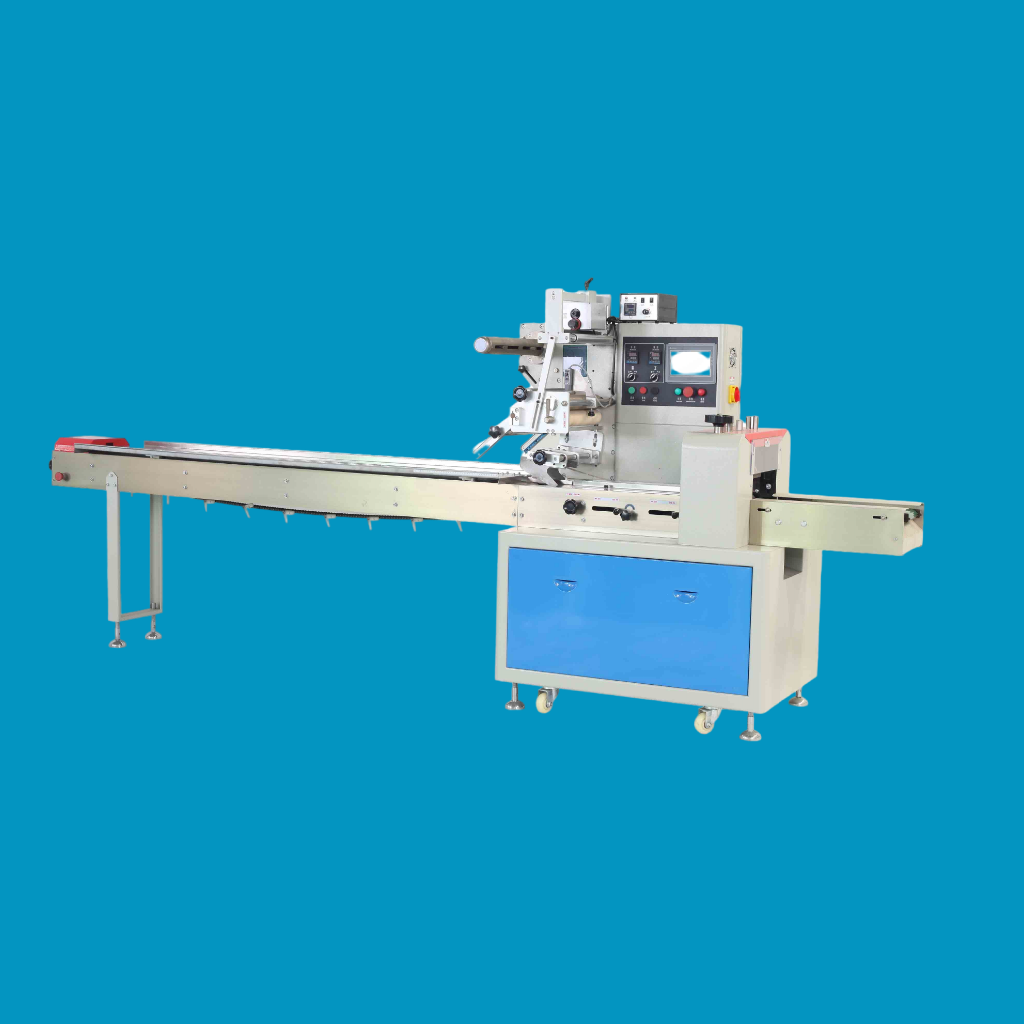
2.3.Machine outline and names for each part (see diagram1)

Diagram1. Outline of rotary type pillow packing machine and the components
2.4.Position and names of adjusting components(diagram 2)

Diagram 2. Positions and names of the adjusting components for Rotary type pillow packing machine
2.5.Technical Specification
Type | 400B | 400D |
Film width | Max. 400mm | |
Bag length | 65~190mm或120~280mm | 90~220mm |
Bag width | 30~110mm | |
Product height | Max. 40mm | Max. 55mm |
Film roll diamete | Max. 320mm | |
Packing speed | 40~230包/分 | |
Power | 220V,50/60Hz,2.4KVA | |
Machine size | (L)3770×(W)670×(H)1410 | |
Machine quality | 800Kg | |
3.Machine installation
3.1.Ground requirement
This machine should be installed on a flat and hard surface.Enough space should be kept around the machine for operation and maintenance(see diagram 3).

Diagram 3. Floor plan for model Rotary type pillow packing machine
3.2.Environment conditions
1) Temperature: Normal environment temperature should be within 5℃~40℃。
2) Humidity: 30%~90%。
3) Keep away from gasoline, chemicals, acid and alkali materials, explosives, and combustibles.
4) Environment illumination: Above 300LUX
5) Keep away from direct sunlight.
6) Keep away from vibrating machines.
7) Avoid direct fan blowing.
3.3.Steps of installation
1) The first step is to determine the installation position, refer to diagram 3. After the machine is set, take the worktable as the level reference to adjust the four level adjusting screws, set the main machine in a level position.
2) Install the feeding machine, fix it to the left side of the main machine with bolts, then adjust the two level adjusting screws of the feeding machine, set it in a level position. For the part connecting with the main machine, the bottom of the feeding chute and the main machine table should be aligned and kept in a same level.
3) Install the push finger chain. Loosen the left handwheel (see diagram2) of the feeding machine, and install and connect the push finger chain. Turn the handwheel to adjust finger chain to a proper tension.
4) Connect power supply line. This machine uses single-phase 220V, 50HZ power supply. Never connect to 380V or other unqualified power supply. Special
Attention must be paid to this requirement! In order to ensure safety, all wiring work should be carried out by qualified professional electricians. Connecting cable must be used, correctly connect the live wire(L), the zero wire(N), and the grounded wire(E).
3.4.Switch on the power and test run
1) Make sure that the power supply is correct (test L, N with a test pencil).
2) Connect all the circuit breakers in the control cabinet, check if all meters and power indicator lamps on the control panel are normal.
3) Press inching button, check if the machine can operate normally.
4) On the human machine interface, set the packing speed to 40 packages per minute, then press the start button (green), run the machine normally for 3 to 5 minutes, after make sure the machine can operate normally, press the stop button (red). Now a correct installtion is completed.
4、 Machine Adjustment
4.1. Feeding mechanism
The feeding mechanism of this machine is equipped with a push finger chain, the tension of the chain is adjusted the two “push finger chain tension adjusting handwheels” on the left end of the feeding mechanism. After the product to be packed is determined, adjust the width of the guide chute of the feeding mechanism to an extent so long as the product to be packed can through the guide chute smoothly.
4.2. Paper feeding mechanism
1) Packing film circumambulating route
After the packing film roll installed on the automatic central aligning clamping roller, the film should circumambulate through certain route. The circumambulating route will be slightly different as whether a code printing machine is installed or not.
a) When the machine is equipped with a code printing machine, the circumambulating route should be arranged as shown in diagram

Diagram 4 the film circumambulating route when the machine is equipped with code printing machine
b) When the machine is not equipped with a code printing machine,the circumambulating route should be arranged as shown in diagram 5.

Diagram 5. The film circumambulating route when the machine is not equipped with a code printing machine.
Regardless what circumambulating route is adopted, when the film enters the bag marker, open the mid-sealing open-and-close handle, make the paper pass through the paper pull wheel, mid-sealing heating board,press-fit wheel, then close the open-and-close handle, run the machine by inching, make the packing film pass through the end sealing knife, now the film installation is completed.
2) Packing film tension and central aligning adjusting
When the packing film pass through the bag maker, if the tension of the packing film is uneven, i.e.,loose in the middle and tight on both sides, or tight in the middle and loose on both sides,the paper transfer will become unsmooth, at this time, it needs to adjust the position of the swing roll (see diagram 2) or the angle of the swing link, this will change the relative position between the swing roll and the bag maker, thus the tension of the packing film will be adjusted to a even tension as required.
If the mid-sealing of the packed product is uneven, it needs to adjust the “packing film central aligning adjusting handwheel” (see diagram 2), until the two sides of the mid-sealing are lined up. Adjustment in each time should not be too large (the adjusted result will not be reflected immediately).
4.3. Bag maker
Bag maker is bag folder that can adjust the width and packing film elevation.
The width of the bag maker can be adjusted through “bag maker width adjusting handwheel”. The proper width of the bag maker should be the width of the packed product plus 5mm positive allowance.
To adjust the height of the bag maker, loose the fixing handwheel of the bag maker, move the bag maker up and down to adjust the height of the bag maker. The height of the bag maker should be the height of the product plus 5mm positive allowance. After adjustment, lock the fixing handwheel.
4.4. Mid-sealing mechanism
Mid-sealing mechanism consists of a paper-pull wheel, heating block, press-fit wheel, open-and-close handwheel, press-fit wheel speed adjusting handwheel etc. When the packing film passes through the paper-pull wheel, heating block, press-fit wheel, if paper is laid up or strained, it should be adjusted with “press-fit wheel speed adjusting handwheel”.
Mid-sealing should result a tight sealing and clear lines, otherwise it should be adjusted, and following is the adjusting method:
1) Put two white papers, between which a carbon paper is sandwiched, onto the mid-sealing wheel and turn it one revolution, open the two white papers, the printed marks on the two white papers should be clear, it not, adjust the meshing position between the two wheels, check the printed marks again, until the printed marks are clear on the papers.
2) If the meshing is correct and the temperature is proper, but sealing quality is still undesirable, it needs to adjust the set screws to limit the meshing pressure of the sealing wheel, till the sealing becomes desirable.
The mid-sealing parts have been adjusted properly in the factory, so it is generally do not need to adjust.
4.5. End sealing mechamism (Rotary type)
1) End sealing knife seat and cutter adjustment
The cutter seat have been adjusted, tested and inspected in a strict way and generally it dose not need make further adjustment. In case adjustment is need, use two white papers, between which a carbon paper is sandwiched, to test and check if the pressed marks on the paper are even and clear, if they are clear, the cutter seat is required, to adjust, loosen the screw M10 (not completely take off), then adjust the crossing adjusting screw to correct the position of the cutter seat, until proper result is reached. At last tighten the screw M10. Adjustment of the cutter can be carried out without heating.
The adjustment of the cutter is generally made by pacing copper sheets. The proper adjustment is that it adjust cut off the film without making much nose. If cutter is unable to be adjusted well, is must be replaced. Adjustment of the cutter must be carried out under out under heating (about 120℃).
2) Adjusting the height of the end dealing knife holder
The height of the end dealing knife holder should be adjusted according to eh height of the packed product so as to make the meshing center of the sealing knife align with the height of the height of the center of packed articles, as shown in diagram 4 and 5. To adjust, loosen the four screws of the side board of the cutter holder, then adjust the up-and-down adjusting screw of the end sealing (the middle screw), making the distance between the meshing position of the upper and lower sealing knives and the working plane is about a half of the height of the packed product. After adjustment, don’t forget to tight the four loosened screws before restart the machine again.
3) Adjusting the end sealing knife speed
The speed of the end sealing knifes should be adjusted according to the different lengths of the packages. The speed should be adjusted so that the linear velocity of the end sealing knifes is equal to the speed of the packing film, there is no paper lay up and straining paper cutter. If there is lay up, is means the knife speed is slow and it needs to increase the speed with the “end sealing knife adjusting handwheel” (see diagram 2); If the paper is strained, is means the knife speed is too high and it needs to decrease the speed with the “end sealing knife adjusting handwheel”, until reach the synchronized speed.
4) Adjusting the cutting position of the end sealing knives
In this feeding machine, the linkage relationship between the between the push rod and the end sealing knives is different according to the lengths of the packages. The method and procedures for adjusting the synchronous relationship between the between the push finger and the end sealing knives are as following.
(A) When color marks are printed on the film package:
(1) When there is no product in packages, select “parameter setting” display and set the value of the “cutting position of the end sealing knives. (refer to section 5.1 for setting method), set the cutting position at the color mark.
(2) Put 3 to 5 packed articles between the push fingers of the feeding mechanism, star the machine, when the packed articles reach 100mm away from the front of the end sealing, stop the machine.
(3) Check to see if the packed articles are between the two color marks, and measure the deviation direction and amount and record them.
(4) Take out the packed articles, adjust the push finger position with the “finger position adjusting handwheel” (the handwheel can be turned after it is pushed inward), so as to adjust the position of the packed articles.
(5) Repeat steps 2 to 4, until the packed articles are just between the two color marks.
(B) When there is no color mark on the film package:
(1) Put 3 to 5 packed articles between the push fingers of the feeding mechanism, star the machine, when the packed articles reach 100mm away from the front of the end sealing, stop the machine.
(2) Check visually to judge if the end sealing position is between the two packed articles and measure the deviation direction and amount and record them.
(3) Take out the packed articles, adjust the push finger position with the “finger position adjusting handwheel” (the handwheel can be turned after it is pushed inward), so as to adjust the position of the packed article
(4) Repeat steps 1 to 3, until the packed articles are just between the two color marks.
4.6. Brush mechanism
The main effect in this mechanism to expels air in the packing bag,increasing the packing bag beautifnl, at the same time benefit in tensport. The pressure that brush add on the packing bag, with a packing film just stick to packing body is proper.
5.Machine operation
1)Safety check:Check and make sure there is no foreign matter on the conveyer belt,
Working table, and end aealing knives, and there is no other person around the machine.
2)Switch on the power. Open the door of the cabinet and cinnect breaker, close the cabinet, check to see if all thermostats and power supply indicator lamp on the conteol board are nirmal, and see if the display of the human-machine interface is normal.
After safety check and the power supply is normal, carry out the following operation:
5.1.Human-machine interface
The main parameters of this machine are set with the hunman-machine interface.
After the power is of this switched on,the first page of the human-machine interface is displayed,as shown in diagram 6.

Diagram 6. The first page of the human-machine interface
8Follow the description on the screen,press the touch key(ENGLISH),the human-machine interface will give a sound and enters the next page(the main menu),as shown in diagrm 7.

Diagram 7.The main menu of the human-machine interface
(A) Parameter setting

Diagram 8. The parameter setting display of the human-machine interface
1)Setting “packing speed”:enter the values by following the description on the screen,if speed value excels the rated the speed of the machine,an error signal will be displayed and ask you to reset the value,until the set value is correct.
2)Setting “packing length”:enter the values by following the descriptions on the screen,if value of package length excels the rated value of the machine,an error signalwill be displayed and ask you to reset it,until the set value is correct.
3)Setting“cutting position”:enter the values by following the descriptions on the screen.To confirm the input value,at frist,set the patrameter of the cutting position to “0”,seal and cut the empty bags,measure the distance”L”between the cutting point and the color mark.
(see diagram 12),and then input the measured value “L” to the “cutting position” parameter.

Diagram 12.Cutting position measuring
(B) Counting

Diagram 13.Yield counting display
This display mainly record the accumulated working time,accumulated output and shift output,so as to facilitate production management for user,
(C)Follow up method
Follow the indication in the“main menu of the human-machine interface”(diagram7),

For packages with color marks(i.e. for product to be followed up through color marks),”Follow up cutting” is used;for packages without color marks, “Length set cutting” mode is used.
(D)Inflating setting(option)

Diagram 15.Inflating display
Setting inflating delay:input the value by following the indication on the screen.The input value should be decided by inflating effect.
2)Setting “inflating time”:input the value by following the indication on the screen,The input value should be decided by inflating effect.
(E) Manual operation

This display is used for single action operation:
a) Paper feed system moves forward and backward
b) End sealing system moves forward and backward
c) Mid-sealing system opens and closes
(F) Quantity packing
This machine contain fixed quantity packing function,When to open the fixed quantity packing and set up the fixed packing quantity,this time,start the packing machine,it normal wouks.When the quantity of packing arrives the packing number set up,the packing machine stops.
After shutting down midway,start the packing machine again,this time,the fixed quantity packing starts calculating from the zero.


(G)System
There will be no further description about the maintenance; please talk to the commissioning teahnicians for detailed method about the system.
5.1.Temperature control
This machine has two sets of temperaturecontral systems,which contral the “mid-sealing temperature”and “end-sealing temperature”respectively.The temperature setting value for each set of the packing speed,the thickness of the packing film,and environment temperature.The optimum temperature setting value should have a result that there id no leakage and burnt crimple for both mid-sealing and end-sealing.The operation method for thermostat is described in the thermostat instruction manual attached to the machine.
5.2.Color mark magic eye
Magic eye is required for products to which following up is needed.After the packing film id installed ,adjust the position of the magic eye;along the light beam emitted from the magic eye with to the place where color marks pass by,as shown in diagram 21.

Diagram 21.Position for light beam of the color mark magic eye
The sensitivity of the color mark magic eye has been adjusted properly in factory.If further adjustment is needed,follow the magic eye instruction manual attached the machine.
5.3.Start
1)Inching
Press and hold the inching button(black),the machine will run in speed of 30packages per minutes,when the keys is relased,the machine will stop immediately.
2)Continuous running
Press the start button(green),the machine will run continuously with the set speed until the stop button(red)or emergency stop button(mushroom shaped)is pressed.
5.4.Stop
1)Normal stop
Press the stop button(red),the machine will stop with the end-sealing knife in the level position.
2)Emergency stop
Press the emergency stop button(mushroom shaped),the machine will stop immediately,to restart the machine ,the reset button must be pressed.
6.Maintenance
6.1.Shift cleaning and maintenance
1)Before cleaning the machine,cut off the power supply to the machine so as to ensure the safety of people and machine.
2)Clean the working table and the surface of the machine with a clean and moistened cloth.
3)Clean off the film scraps stuck to feeding mechanism,mid-sealing mechanism and the end-sealing mechaism with compressed air.
4)Clean off the film scraps stuck to the end-sealing knife with a steel wire brush.
6.1.Monthly check and maintenance
1)Add lubricating oil to the meshing gears of drive system and the chains of the chain wheel,a thin layer of lubricating oil is enough.It is not allowed to add lubricating oil to the synchronous belt of the machine and the flat conveyer belt.
2)Add lubricating oil to the end-sealing bearing.
3)Check the tension of the drive chain and belt,retighten of necessary.
4)Check all the screws and nuts,if there is any for loose screw or nut, retighten it.
5)Check carbon deposit,clean if necessary.
6.2.Biannual check and maintenance
1)Check the wearing condition of the drive belt and the flat conveyer belt,replace if necessary.
2)Check all the wearing parts,replace the worn parts in time.
3)Check the wearing condition of the drive parts,replace if necessary.
4)Check the electric wiring and tighten if necessary.Clean the dust from the electric elements with compressed air.
7.Resolving abnormalities
Problems | Prossible causes | Remedies |
Cutting position is deviated from the color marks | 1、Color mark follow up is not used
2、The film color marks is weak
3、Film is slipping. | 1、Change follow up method into”follow up cut”in the follow up method display of the human-machine interface. 2、Refer to the magic eye instruction manual attached to adjust the sensitivity of the magic eye. 3、Adjust the tension of the rubber roller or the degree of tightness of the brake, |
The cutter cut on product | 1、The push rod and the cutter are asynchronous. 2、The height of the cutter seat is improper.
3、Packing speed is too high. | 1、Refer to section4.4.6 about push finger position. 2、Adjust the high of the end-sealing parts,adjust the sealing knife meshing center to the half of product height, 3、Decrease the packing speed. |
Burnt crimples appear on the seal | 1、Temperature is too high. 2、Speed is too low. 3、The thermal endurance of the film’s inner layer is poor. | 1、Bring down temperature. 2、Increase the speed 3、Replace with better film. |
Sealing is loose or missed | 1、Temperature is too low 2、Speed is too high 3、The thermal endurance of the film’s inner layer is poor. | 1、Increase the temperature. 2、Decrease the speed 3、Replace with better film. |
Thermostat does not control temperature | 1、Heating element is damaged. 2、Solid is too high 3、Thermocouple is damaged 4、Temperature control meter is damaged. | 1、Replace the heating element. 2、Replace the solid state replay 3、Replace the thermocouple 4、Replace the thermostat |
8.List of attached documents,fittings and tools
(A) Documents
Instruction manual
PLC construction specification
Transducer instruction manual
Thermostat instruction manual
Color mark magic eye instruction manual
Approach switch instruction manual
(B)Fittings
Push block nylon,10 pieces,or stainless eteel,5 pieces
End-sealing cutter 1pair
Mid-sealing drive belt 1piece
Mid-sealing electric heating tube 2pieces 110V 200W
End-sealing electric heating tube 2pieces 110V 200W
Power cord 5meters
(C)Tools
1. Monkey wrench 1pieces
2. Hexagon ring spanner 1set
3. “-” type screw driver 1 pieces
4. “+”type screw drover 1 pieces

 中文
中文